

How to Test Deferred Deep Links on iOS
A simple guide for any deeplink tester to learn how to test deferred Deep Links on real iOS devices instead of emulators or simulators.

1. Introduction:
A deferred deep link is a special type of link that can open a specific part of an app, but only after you've installed the app first.
For example, your friend sends you a link to join their game in a gaming app you don't have installed yet. When you click the link, it will first take you to download and install the app. Once installed and opened, the link will then take you directly to the screen where you can join your friend's game, instead of just opening the app's home screen.
The "deferred" part means the link defers or waits until you've installed the app before taking you to the specific in-app content. It's a way to provide a better user experience by deep linking directly to what you want to see or do within an app, after ensuring you have the app first.
You can take Deferred deep links as part of the navigation system working in the OS that helps navigate to different URLs and apps. This innovative approach streamlines access to specific in-app content and ensures that the pathway remains uninterrupted, regardless of the app's installation status at the initial point of contact.
Deferred deep links represent a very important tool in enhancing user engagement, facilitating a smooth transition from initial interaction to targeted app content. This functionality is crucial, especially in a market where user retention and uninterrupted user experience are important.
By utilizing deferred deep linking, developers can significantly improve their app's accessibility and user-friendliness, thereby increasing the likelihood of higher engagement rates and, ultimately, a more successful app.
2. Setting the Stage for Deferred Deep Link Testing
Before we go into the testing phase, it's crucial to ensure you've got all your ducks in a row. Testing deferred deep links on iOS demands a well-prepared environment where every component plays its part without causing problems.
Essential Tools and Configurations:
1. Xcode: Your primary battlefield. Ensure you have the latest version installed to take advantage of the most recent features and compatibility options. You can download or update Xcode via the Mac App Store.
2. iOS Simulator or Real Device: While simulators are great for initial tests, nothing beats the authenticity of testing on a real device. Make sure you have access to an iOS device with the required OS version for your application.
3. Deep Link Testing Tool: Consider tools like Apple's Universal Links for testing traditional deep links and third-party services like Branch or Adjust for more complex deferred deep link scenarios.
4. Mobot: Mobot uses Real robots for the mobile tests. It utilizes mechanical robots to automate difficult app tests and monitor mobile campaigns.
Preparing Your iOS Project:
1. Configure URL Schemes: In your Xcode project, navigate to your app's target, then to the 'Info' tab. Under 'URL Types', add a new URL type and configure a custom URL scheme that your app will respond to.
2. Implement Universal Links: For deferred deep links, Universal Links are a must. You'll need to host an Apple App Site Association (AASA) file on your server and ensure it's properly linked to your app via the Associated Domains in Xcode.
3. App Delegate Methods: Dive into your `AppDelegate.swift` or `AppDelegate.m` file. Ensure you implement the `application(_:continue:restorationHandler:)` method, which handles incoming universal links.
Code Snippet Example:
```swift
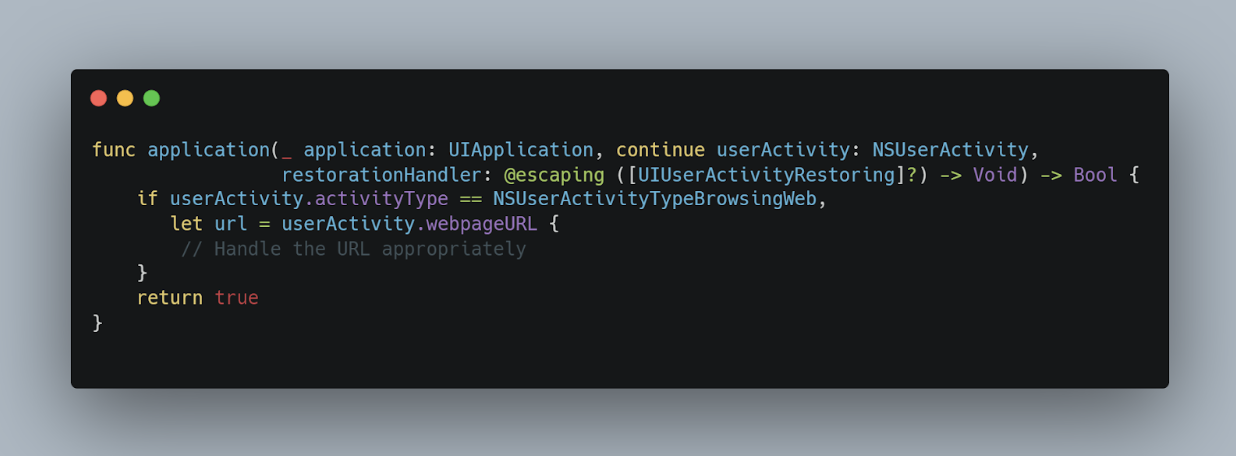
This snippet checks if the incoming activity is a web browsing type and then extracts the URL, where you can parse and handle it according to your app's logic.
3. Integrating Deferred Deep Links into Your iOS App
Deferred deep linking can enhance the user experience by guiding new or returning users to specific content or promotions within your app, even if they haven't installed the app when they first click the link. Here's how you can set this up in your iOS app:
Deep Linking Frameworks and Services
First, decide whether you'll use a custom solution or leverage a third-party service. While building your own deep linking infrastructure offers flexibility, it requires considerable effort to manage edge cases and analytics. Third-party services like Firebase Dynamic Links, Branch, or Adjust provide comprehensive solutions that cover most use cases with less overhead.
Implementing with a Third-Party Service (Example: Firebase Dynamic Links)
1. Firebase Setup:
- If you haven't already, add your iOS app to your Firebase project in the Firebase console. You'll need your app's bundle ID.
- Download the `GoogleService-Info.plist` file and add it to your project.
2. Firebase SDK Integration:
- Integrate the Firebase SDK into your project using CocoaPods, Carthage, or Swift Package Manager. For CocoaPods, add `pod 'Firebase/DynamicLinks'` to your Podfile and run `pod install`.
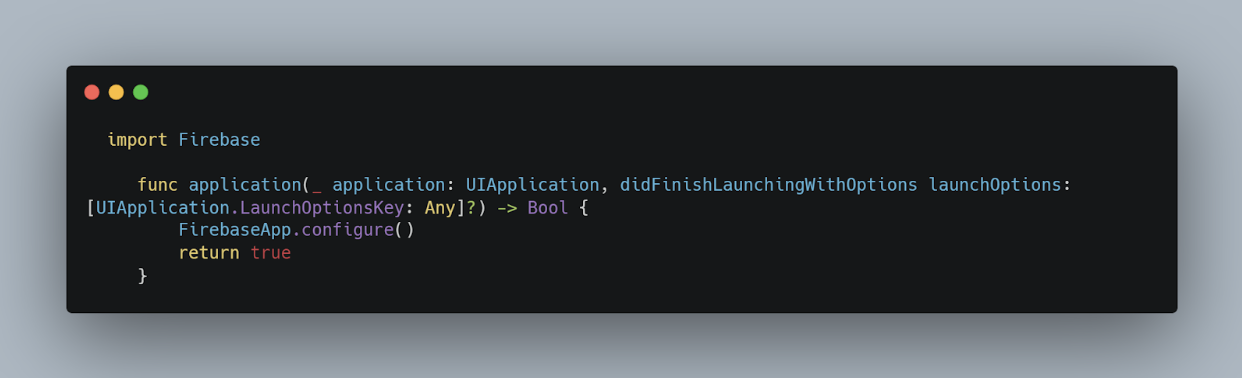
3. Configure Deep Links:
- In your AppDelegate, import Firebase and configure the Firebase app in the
<pre><code>` `application(_:didFinishLaunchingWithOptions:)` method:
```swift</code></pre>
- Implement the method to handle incoming dynamic links:
```swift
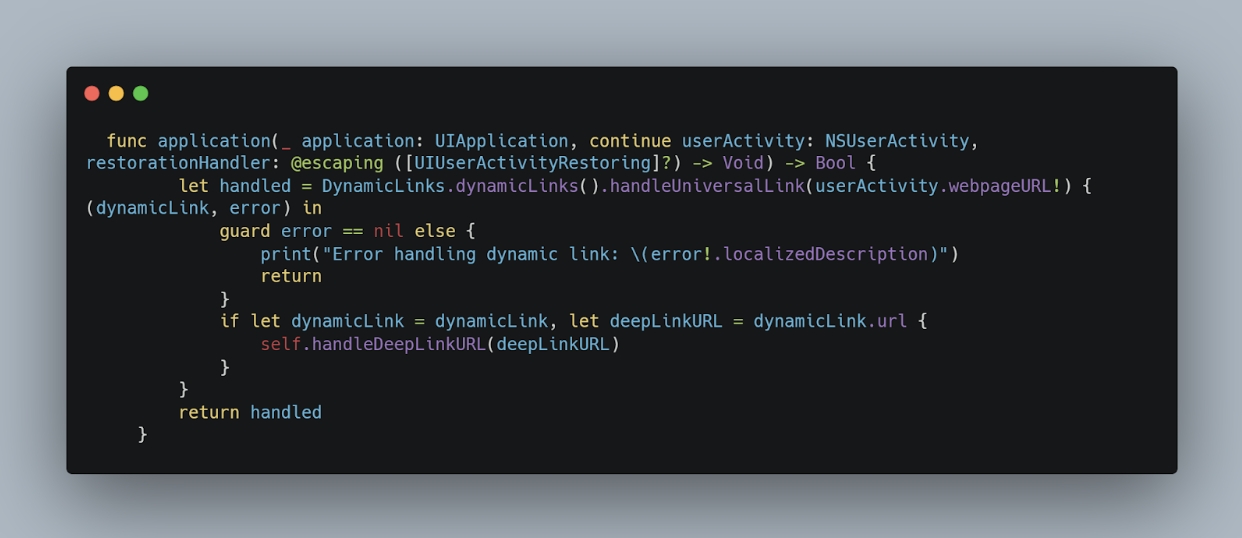
- Create a method `handleDeepLinkURL(_:)` to parse the URL and navigate to the appropriate part of your app.
Testing Your Implementation
Before moving to external testing tools, ensure your deep links work as expected:
1. Use the Firebase console to create a dynamic link.
2. Send the link to your device via email or messaging.
3. Click the link to test the behavior when the app is installed and not installed.
Remember, thorough testing on various devices and OS versions is crucial to catch any edge cases. In the next sections, we'll explore local testing strategies and how tools like Mobot can automate and scale your testing efforts, ensuring your deferred deep links work seamlessly across all scenarios.
4. Local Testing of Deferred Deep Links
Once you've integrated deferred deep links into your iOS app, the next crucial step is to validate their functionality. Local testing provides an immediate, controlled environment to troubleshoot and fine-tune your implementation before wider testing and deployment. Here’s how to conduct effective local testing of deferred deep links on iOS:
Simulating Deferred Deep Links
Deferred deep links are unique in that they must direct users to the intended content even if the app isn't installed at the time the link is clicked. To simulate this:
1. Uninstall Your App: Begin by ensuring the app is not installed on your testing device or simulator. This sets the stage for testing the "deferred" aspect of the deep link.
2. Simulate the Link Click: Use a tool like Apple's Safari or a messaging app on the device to access the deferred deep link. This can be done by sending the link to the device via email or messaging.
3. Install the App: After clicking the link with the app uninstalled, proceed to install the app from the App Store (for fully integrated tests, you may use TestFlight or a local installation from Xcode).
4. Verify Deep Link Behavior: Upon first launch, your app should detect the deferred deep link and navigate to the appropriate content or feature as intended.
Testing with Xcode and iOS Simulator
For a more immediate and iterative testing process, you can use Xcode and the iOS Simulator:
1. Launch Your App via Xcode: Start by running your app in the iOS Simulator from Xcode. Ensure you're testing on the correct version of iOS that matches your target audience.
2. Use Terminal to Simulate Deep Links: With the app installed and running in the simulator, open Terminal on your Mac and use the `xcrun simctl` command to open URLs in the simulator. For example:
```bash

This command simulates the user clicking on the deep link. Ensure your app handles the URL appropriately and navigates to the correct content.
3. Test Without the App Installed: To test the deferred aspect, uninstall the app from the simulator, then run the `xcrun simctl` command again. Install the app from Xcode, and ensure the deep link's intended destination is reached upon first launch.
Automating Local Tests
To streamline the testing process, consider scripting a series of actions that automate the installation, launching, and link handling in your app. This can significantly reduce the manual overhead and ensure consistency in testing.
Key Considerations
- Consistent State: Ensure the simulator or device is in a consistent state before each test, particularly regarding the app being installed or uninstalled.
- Network Conditions: Deferred deep links often rely on network calls to fetch link data. Simulate various network conditions to ensure links are handled gracefully under different scenarios.
- Error Handling: Pay close attention to how your app handles errors or edge cases, such as invalid or expired links.
Local testing is a critical step in ensuring the reliability of deferred deep links in your iOS app. By simulating real-world scenarios and automating repetitive tasks, you can identify and address issues early in the development cycle, paving the way for a smoother, more reliable user experience.
5. How to Test Deferred Deep Links on iOS
Testing deferred deep links on iOS involves more than just checking if a link opens your app.
The main purpose is to deliver a smooth user experience, guiding them from a link click to the desired content, even without the app installed initially. Testing these links rigorously across different scenarios is crucial to ensure they function as intended, providing a seamless journey for the user.
1. Preparing Test Scenarios
Start by outlining all the scenarios in which your deferred deep links should be tested. Consider:
- First-time app installation: The app is not installed when the deep link is clicked. After installation, the app should redirect to the intended content.
- App updates: Ensure deep links continue to work correctly after app updates.
- Different user states: Test for users who are logged in, logged out, or new to the app.
- Various devices and iOS versions: Ensure compatibility across different devices and operating system versions.
2. Manual Testing Process
Manual testing allows you to closely observe how deferred deep links behave in real-world scenarios:
- Uninstall your app: If it's already installed, remove it from your test device to simulate a new user experience.
- Click the deep link: Use a browser or a messaging app on your test device to access the deferred deep link.
- Install the app: Go to the App Store and install your app. If you're in a development or testing phase, you might use TestFlight or a development build from Xcode.
- Verify the redirect: Upon opening the app for the first time after installation, check if it redirects to the content or page the deep link pointed to.
3. Using iOS Simulator
For a more controlled environment, the iOS Simulator in Xcode can be invaluable:
- Simulate the deep link click: Use the command line to simulate opening a deep link in the iOS Simulator. The command `xcrun simctl openurl booted "<deep-link-url>"` can be used for this purpose.
- Observe the app's behavior: After installing and launching your app in the simulator, monitor how it handles the deep link. Ensure the simulator is set to a clean state (app not installed) before testing.
4. Automating Deferred Deep Link Tests
Automation can significantly increase the efficiency and coverage of your testing process. Consider using XCTest for UI tests that include deferred deep link scenarios. Write test cases that:
- Automate app installation: Simulate app installation after a deep link has been clicked.
- Verify navigation: Automate the verification process to ensure the app navigates to the correct content after installation.
5. Utilizing Analytics for Verification
Integrate analytics to log events when deep links are followed. This can help verify that:
- Deep links are captured: Ensure that deep link URLs are correctly captured by your app upon installation.
- Redirection is successful: Confirm that users are taken to the intended destination within the app.
6. Third-Party Tools and Services
Utilize third-party tools like Adjust, Branch, or Firebase to facilitate testing. These platforms offer comprehensive testing suites and analytics to streamline the process. For example, Branch provides a "Liveview" feature that allows you to see real-time link clicks, app opens, and custom events, making it easier to debug issues.
By following these steps, you can create a robust testing framework for deferred deep links in your iOS app. This ensures not only a smoother user experience but also helps in optimizing conversion rates, user retention, and overall app success. Remember, the key is to simulate as closely as possible the real-world scenarios your users will encounter, providing you with valuable insights into the performance and reliability of your deep linking strategy.
6. Leveraging Third-Party Tools for Enhanced Testing
Thorough testing of deferred deep links on iOS can be an intricate process, especially when ensuring that the links perform correctly across various devices, operating systems, and user scenarios. While local and manual testing plays a very critical role, leveraging third-party tools can significantly enhance your testing capabilities, offering automation, scalability, and insights that manual testing alone cannot provide.
The Role of Automated Testing Tools
Automated testing tools can simulate a wide range of user interactions and conditions, from clicking a deferred deep link for the first time to reinstalling the app and accessing the link again. These tools can automate repetitive tasks, freeing up valuable time for your team to focus on more complex testing scenarios or other development tasks.
Choosing the Right Tool
When selecting a third-party tool for testing deferred deep links, consider the following factors:
- Integration Ease: How seamlessly can the tool integrate with your current development and testing workflows?
- Device Coverage: Does the tool offer a broad range of real device and OS version combinations to test on?
- Customization and Flexibility: Can you tailor the tests to simulate specific user journeys and edge cases relevant to your app?
Mobot: A Case in Point
Mobot is an example of a third-party testing service that employs real, physical devices to automate app testing, including deferred deep link scenarios. Using Mobot, you can:
- Automate User Journeys: Simulate complex user interactions that lead to the triggering of deferred deep links, ensuring that your app behaves as expected in real-world conditions.
- Test Across Devices: Access a diverse range of devices and OS versions to ensure broad compatibility and performance consistency.
- Gain Actionable Insights: Receive detailed reports and insights on test outcomes, helping you identify and rectify issues efficiently.
Integrating Third-Party Testing into Your Workflow
Incorporating tools like Mobot into your testing strategy involves:
1. Setting Up Test Scenarios: Define the specific deferred deep link scenarios you want to test, including the initial user action, the expected app behavior upon clicking the link, and the final app state.
2. Configuring the Test Environment: Set up your test environment within the tool, specifying device configurations, OS versions, and any prerequisites needed for the test.
3. Executing Tests: Run the tests, utilizing the tool's automation capabilities to simulate user actions and interactions with the deferred deep links.
4. Reviewing Results: Analyze the test results, focusing on any failures or anomalies to understand their cause and impact on the user experience.
7. Debugging Common Issues in Deferred Deep Link Testing
Remember, the key to successful debugging is to isolate the problem, understand its root cause, and apply a targeted solution. Even if you've been super careful with setting things up and testing, you might still run into some problems when working with deferred deep links on iOS. So let us discuss some of the common issues you could face and talk through practical ways to troubleshoot and fix 'em up. The secret ingredient is to isolate the problem, figure out what's really going on under the hood, and then apply the right solution to knock it out.
1. Deep Link Does Not Open the App
When a deep link fails to open your app, it can be due to several reasons:
- Incorrectly Configured Universal Links: Verify your Associated Domains in the Xcode project and ensure your Apple App Site Association (AASA) file on the server is correctly configured. Use Apple's AASA validator tool for quick checks.
- App Not Registered to Handle URL Scheme: If you're using URL schemes, ensure they are correctly defined in your `Info.plist` and that your app delegate or scene delegate properly handles incoming URLs.
2. Deferred Deep Link Not Triggering After App Install
This issue is typically related to the handoff process between clicking the link, installing the app, and launching it for the first time:
- Missing or Incorrect Link Data: Ensure that the deep link information is being correctly stored and retrieved post-installation. This might involve server-side logging and debugging to track the deep link journey.
- Improper Handling in App Launch Code: Review the code in your AppDelegate or SceneDelegate that handles the deep link. It should correctly parse the link and navigate to the intended content, even on the first launch after installation.
3. Incorrect Content Displayed Upon Deep Link Navigation
If your app opens but navigates to the wrong content:
- URL Parsing Issues: Verify that the URL parsing logic in your app correctly interprets deep link parameters. Unit tests can be beneficial here to cover various URL formats and expected outcomes.
- State Management: Ensure your app's state management correctly handles deep link navigation, especially if the app was already running in the background.
Debugging Tools and Techniques
- Logging: Implement detailed logging around your deep link handling code. Log the incoming URL, the parsed parameters, and the navigation path within the app.
- Proxy Tools: Use network proxy tools like Charles or Proxyman to monitor the network traffic between your app and the server, especially for deferred deep links that may involve network requests to retrieve link data.
- Breakpoints and Step Debugging: Set breakpoints in your deep link handling code to step through the execution flow. This can help identify where the process deviates from the expected path.
Testing Edge Cases
Don't forget to test edge cases, such as:
- App Updated After Deep Link Clicked But Before Installed: This scenario can help verify that deep link handling is backward compatible across app versions.
- Multiple Deep Links Clicked in Succession: Ensure your app correctly handles scenarios where users may click multiple deep links before installing the app.
By systematically addressing these common issues and employing robust debugging practices, you can significantly enhance the reliability and user experience of deferred deep links in your iOS apps. Remember, every bug fixed is a step closer to a seamless user journey from link click to app content.
8. Understanding and Utilizing the Deep Link Validator Tool
Designed to scrutinize and validate deep links for Android apps or specific App Links or Custom Schemes within apps, this tool offers a comprehensive analysis to ensure your deep links are set up correctly.
Accessing the Tool:
To access the Deep Link Validator, navigate to your Google Ads account and select the Tools icon. Under the "Planning" section, opt for the "App advertising hub," where you'll find the Deep Link Validator. This tool is designed to simplify the validation process, offering insights into potential configuration issues and how to rectify them.
Operational Guide:
Utilizing the Deep Link Validator involves a few straightforward steps:
1. App Selection: Choose between validating your entire app or a specific link within the app. This flexibility allows you to conduct a broad analysis or focus on individual elements as needed.
2. Validation Process: For a comprehensive app evaluation, select "Android" from the dropdown and pick your app. Opting to validate all deep links will generate a report detailing each link's status found in your app's manifest file. This thorough scan ensures each link is configured correctly, highlighting any that may not work as intended.
3. Interpreting Results: The validation report is a goldmine of information, categorizing links into those that fail app or website checks and those that are valid. Each category provides detailed insights, from failed checks and their implications to actionable steps for rectification. This detailed breakdown helps pinpoint specific issues, streamlining the troubleshooting process.
4. Actionable Insights: The Deep Link Validator Tool doesn't just point out problems; it also provides practical solutions to fix any missed configurations. If your website or app fails the check, the tool clearly explains what needs to be done to improve your app's deep link setup. It's like having a knowledgeable friend guiding you through the process.
5. Continuous Improvement: Using this tool shouldn't be a one-time thing. Think of it as a trusty companion you'll want to keep by your side. Bring it along as you develop and market your app, and let it help you make sure those deep links are working like a charm. That way, when you update your app or your users' needs change, those deep links will still be solid and get the job done.


.jpg)


.jpg)