

Curious of how to test embedded webviews on iOS? Check out our latest guide to learn how.
.png)
Introduction
WebViews are a popular method for smoothly integrating dynamic web content into mobile apps and are often used to embed web content within iOS applications. Nonetheless, there are certain difficulties with this connection. It is crucial to make sure the site content loads correctly and functions well in a variety of scenarios. Furthermore, it is imperative that WebView's interactions with the application's native components continue to be dependable and consistent. Inconsistencies may compromise the app's functionality and result in a fragmented user experience. For WebViews to work as intended across a range of devices, operating systems, and network conditions, extensive testing is therefore necessary.
Understanding Embedded WebViews
What are WebViews?
A WebView is a component used in mobile applications to display web content within a native app context. It functions as an in-app browser, allowing developers to embed web pages seamlessly into their mobile applications. This is particularly useful for displaying content that might change frequently or for embedding a portion of a website into the mobile app.
WebView vs. Native Components
While WebViews and native app components can display similar content, they operate differently. Native components are built specifically for the platform (iOS in this case) using Swift or Objective-C and are generally faster and more efficient. WebViews, however, load HTML content which is rendered by the web engine embedded in the app. This can introduce unique challenges, such as slower load times and potential security risks.
Why Test WebViews?
WebViews interact with web content and the broader internet, which introduces variables that might not be as controlled as those within a native application environment. Testing ensures that the WebView handles content correctly, adapts to different data inputs, and integrates seamlessly with the rest of the application. This is essential not only for functionality but also for maintaining a high level of performance and security.
Setting Up the Test Environment
Preparing a robust testing environment is the first step towards efficiently testing WebViews on iOS. This setup involves selecting the right tools and configuring your test systems to mimic real-world user interactions with web content embedded within an iOS app. Here, we'll discuss how to choose and use the appropriate tools and outline the steps to configure your iOS simulator or device for effective testing.
Tools and Frameworks
To start, you'll need Xcode, Apple's integrated development environment (IDE), which includes all the necessary tools to develop, test, and debug iOS applications. Xcode's built-in simulator provides a convenient way to emulate different devices and iOS versions. It's critical to ensure that the Xcode version you are using supports the latest iOS versions to cover recent WebView functionalities.
For automated testing of WebViews, XCTest — Apple’s framework for unit testing, UI testing, and performance testing — is invaluable. XCTest integrates seamlessly with Xcode, allowing you to write tests that are maintainable and easy to understand. Additionally, for more specialized testing needs, consider integrating third-party tools like Selenium or Appium, which support automated browser testing within WebViews.
Configuring the iOS Simulator
- Selecting Device Types and iOS Versions: Begin by launching the iOS simulator from Xcode and setting up the devices you intend to test. It's advisable to test on multiple devices (e.g., iPhone, iPad) and iOS versions to ensure comprehensive coverage.
- Network Settings: Since WebViews load content from the internet, configuring the network settings of the simulator to test under various network conditions is crucial. Tools like Network Link Conditioner can help simulate different network bandwidths and latencies.
- Privacy and Security Settings: Adjust the simulator’s settings to mimic the privacy and security conditions under which the WebView will operate. This includes permissions related to location, camera, and photo library access, as these might affect how content is loaded and interacted with within the WebView.
- Debugging Options: Enable the Web Inspector in Safari settings to debug WebViews. This tool allows you to inspect the HTML and CSS of the pages loaded in the WebView and debug them as you would with web pages in Safari.
By carefully setting up your testing environment with the right tools and configurations, you can simulate a range of real-world scenarios. This preparation is essential for identifying and resolving issues before your app reaches your end-users, ensuring a high-quality user experience.
Test Strategies for Embedded WebViews
Effectively testing WebViews in iOS apps involves a series of strategic approaches tailored to uncover various potential issues from functional flaws to performance and security vulnerabilities. This section explores these strategies to provide mobile engineers and QA professionals with a framework for thorough and effective testing.
Functional Testing
Functional testing of WebViews ensures that the web content is not only loading but also interacting correctly within the app. Here’s how you can approach it:
- Content Loading: Verify that all web content loads correctly without errors. This includes text, images, videos, and any interactive elements. Use XCTest to automate tests that check for the presence of specific elements on the page.
- Link Navigation: Test all links within the WebView to ensure they navigate correctly. This includes internal links that should remain within the WebView and external links that may need to open in a separate browser.
- Form Submission: If your WebView includes forms (like login screens), test the submission process. Automate input of various data sets to verify form handling and error messaging.
- Interaction with Native Components: Ensure that interactions within the WebView do not disrupt the native parts of the application. For instance, gestures like swipes and taps should have the expected outcomes whether they are interpreted by the WebView or the native app.
Performance Testing
Performance testing focuses on how well the WebView functions under various conditions:
- Load Time: Measure how long it takes for content to fully load within the WebView, especially when handling complex or heavy content. Tools like XCTest’s performance metrics can automate this testing.
- Responsiveness: Test the responsiveness of the WebView to user interactions, such as scrolling and zooming, particularly on devices with different hardware capabilities.
- Memory Usage: Monitor the memory usage of your app when the WebView is active, looking for any potential leaks or spikes that could affect performance.
Security Testing
Security testing is critical, as WebViews can often be a vector for security vulnerabilities:
- Input Sanitization: Ensure all inputs passed to the WebView are sanitized to prevent injection attacks, such as XSS (Cross-Site Scripting).
- Secure Communication: Verify that the WebView enforces HTTPS to secure all communications between the app and the web content. Tools like Mobot can be used to automate routine checks, ensuring compliance with security standards without heavily focusing on manual testing strategies.
- Content Security Policy (CSP): Implement and test CSP headers to mitigate the risk of content injection attacks. Ensure these policies are enforced within the WebView environment.
By applying these focused testing strategies, developers and testers can ensure that their WebViews are not only functional but also performant and secure. This holistic approach to testing plays a crucial role in maintaining the overall quality and security of iOS applications.
Automated Testing of WebViews
Automating tests for WebViews in iOS apps can significantly enhance the efficiency and reliability of the testing process. Automation allows for repetitive tests to be executed consistently and provides the ability to perform regression testing swiftly after each update. This section will guide you through setting up automated tests using popular tools and scripting effective test cases to ensure your WebViews perform as expected.
Choosing Automation Tools
For iOS WebView testing, several automation tools are available that can simulate user interactions within a WebView environment. Here are two widely used tools:
- Selenium WebDriver: Although primarily used for web applications, Selenium can be configured to test iOS WebViews when used in conjunction with Appium. This setup allows you to control Safari on an iOS device to interact with WebViews just like a user would.
- Appium: Appium is an open-source test automation framework that uses WebDriver protocol, and it is particularly useful for applications that include WebViews. It supports testing in multiple languages and integrates well with XCTest, which is Apple's own testing framework.
Writing Automated Test Scripts
Automated test scripts simulate user actions like clicking, scrolling, and typing within the WebView. Below is a basic example of a script using Appium to test a WebView on iOS:
Python
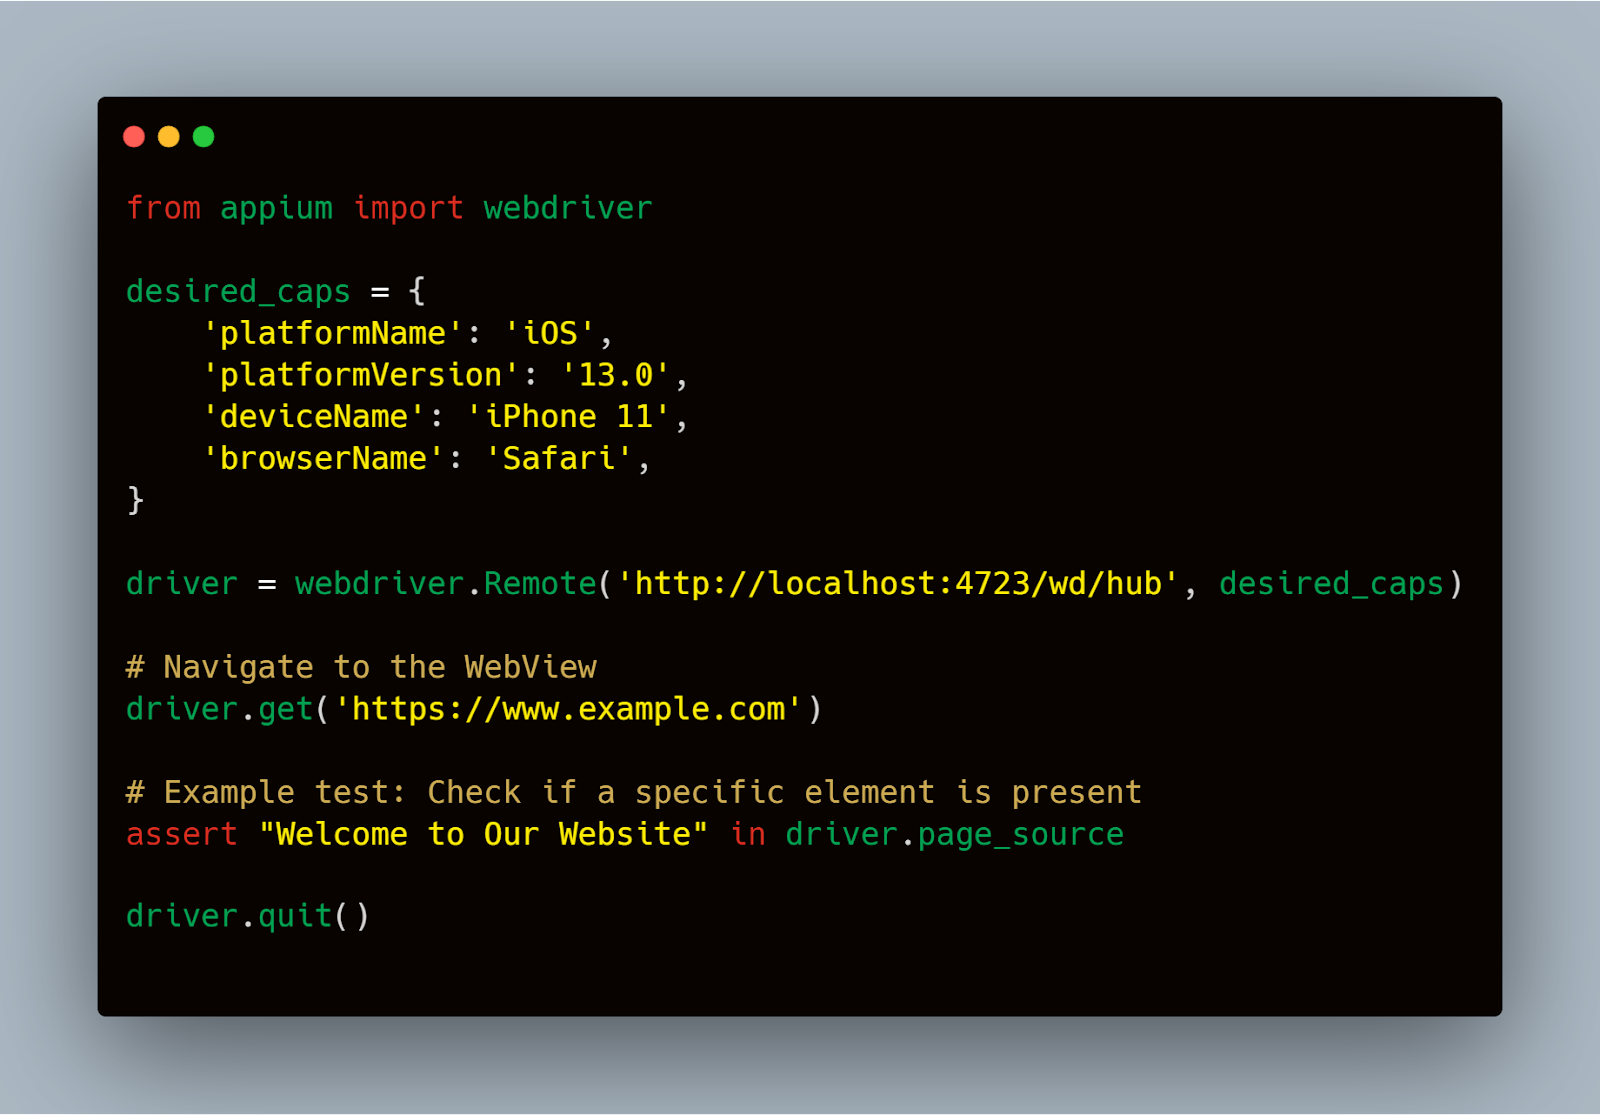
This script initializes a session in Safari on an iPhone 11, navigates to a specified URL, and checks if a certain text is present on the page. Similar scripts can be adapted to fit specific testing needs, such as form submissions or link validation within a WebView.
Integration with Continuous Integration (CI) Systems
Integrating your automated tests into a CI pipeline such as Jenkins, CircleCI, or GitHub Actions ensures that tests are run automatically whenever changes are made to the codebase. This practice helps in identifying issues early in the development cycle, making it easier to address them promptly without affecting the project timeline.
- Setup CI Pipeline: Configure your CI system to initiate the test suite on every code commit. This setup should include environment settings for the iOS simulator or real devices.
- Execute Tests: Ensure your CI system can execute the automated tests, collect results, and report failures in an actionable manner.
- Monitor and Optimize: Regularly review test results and performance. Optimize tests to reduce execution time while maintaining thorough coverage.
Automated testing is a powerful strategy to enhance the robustness and reliability of iOS applications using WebViews. By effectively utilizing tools like Appium and integrating testing into CI workflows, teams can ensure that their apps meet the high standards expected in today's fast-paced development environments.
Mobot is particularly adept at performing routine security checks, ensuring that every new release of your application complies with the latest security standards and regulations. This is crucial for maintaining the integrity of the app and protecting user data. Automating these security checks with Mobot not only enhances the efficiency of your testing processes but also ensures consistent adherence to security best practices. This can be immensely beneficial for teams aiming to automate repetitive yet critical aspects of their testing workflow, thereby freeing up resources to focus on more complex testing scenarios.
Common Issues and Troubleshooting
Testing embedded WebViews in iOS apps often exposes a variety of issues that can affect both the functionality and user experience. Understanding these common problems and knowing how to effectively troubleshoot them is crucial for any mobile engineer or QA professional. This section details some typical challenges encountered when testing WebViews and provides strategies for diagnosing and resolving these issues.
Handling Cross-Origin Requests
Issue: WebViews may need to load content that originates from different servers or domains, which can lead to cross-origin request errors due to same-origin policy restrictions.
Solution: Ensure that the server hosting the web content includes appropriate CORS (Cross-Origin Resource Sharing) headers. For iOS, it's also crucial to correctly configure the WKWebView configuration settings to allow specific types of cross-origin requests if needed.
Cookie Management
Issue: Managing cookies within WebViews can be problematic, especially when dealing with sessions or personalized content. Cookies may not always save or retrieve as expected, leading to issues with user sessions or data retrieval.
Solution: Use the WKHTTPCookieStore class available in WKWebView to directly manage cookies. This allows you to observe and manipulate the cookie store, ensuring that cookies are handled correctly across sessions.
Debugging Tools and Techniques
To effectively troubleshoot issues within a WebView, utilize a combination of the following tools and techniques:
- Safari Developer Tools: Connect your iOS device or simulator to a Mac and use Safari’s developer tools to inspect the WebView. This provides direct insights into the HTML and JavaScript running within the WebView, allowing for real-time debugging.
- Console Logs: Implement extensive logging within the web content loaded in the WebView. Console logs can be redirected to the native side using WKScriptMessageHandler to help trace issues like JavaScript errors or network requests.
- Network Traffic Monitoring: Tools like Charles Proxy or Wireshark can be used to monitor and debug the network traffic between the iOS device and the servers. This is particularly useful for identifying issues with HTTP requests, responses, and the handling of data payloads.
Example: Diagnosing a Load Failure
Scenario: A WebView fails to load a particular URL, and the error message is vague.
Troubleshooting Steps:
- Check Network Connectivity: Verify that the device has a stable internet connection.
- Validate URL and Server Response: Ensure the URL is correct and the server is responding as expected using a tool like curl or Postman.
- Examine WebView Configuration: Review the WebView’s configuration settings to ensure they are not overly restrictive or misconfigured, particularly regarding JavaScript execution and content security policies.
- Use Safari Developer Tools: Connect to Safari's Web Inspector to look for JavaScript errors or issues in the console that might indicate why the page is failing to load.
When addressing common issues and their troubleshooting strategies in iOS WebView testing, integrating tools like Mobot can greatly enhance the efficiency and effectiveness of the process. Mobot, specifically, excels in identifying and diagnosing UI/UX issues that might not be immediately apparent. This capability stems from Mobot’s ability to reproduce errors consistently by running tests across a variety of device configurations. Such a feature is indispensable, particularly for issues that elude detection during manual testing, ensuring that your application’s user interface behaves as expected under diverse conditions. This integration not only simplifies the troubleshooting process but also significantly reduces the time and resources typically required for such tasks.
By anticipating common issues and mastering these troubleshooting techniques, developers can ensure that their WebViews function reliably, maintaining a seamless integration of web content within their iOS applications. This proactive approach to problem-solving not only improves the quality of the app but also enhances the overall user experience.
Conclusion
Using WebViews to embed web content into iOS applications is a popular method that is preferred for its capacity. To sum up, you need to test WebViews in iOS applications well if you want to make sure that online content works safely and smoothly with your app. You may greatly improve the performance and dependability of your iOS applications by putting the techniques described in this guide into practice. These tactics include automating tests, utilizing focused testing techniques, building up a strong test environment, and addressing common problems.


.jpg)


.jpg)